Raspberry PiLink
OverviewLink
The software for the Cablebot consists of three components:
- The main software running on the Raspberry Pi Zero of the camera module. This is a combination of GNU/Linux and the ROMI software, found at https://github.com/romi/romi-rover-build-and-test
- The firmware for the motor controller, found at https://github.com/romi/romi-cablebot/tree/camera-integration
- The firmware to control the panning of the camera, found at https://github.com/romi/libromi/tree/ci_dev/firmware/BLDC
In addition, the installation requires the following actions on the Raspberry Pi Zero:
- Create the "romi" user account.
- Configure the Wi-Fi to connect to an existing Wi-Fi
- Enable the SSH server
- Enable the legacy camera interface.
- Configure the serial ports.
- Configure the start-up scripts.
- Install and configure the Apache HTTP server for the web interface.
- Configure the backup/transfer of the images.
Installing the Raspberry Pi ZeroLink
Install the Linux operating systemLink
Download Raspberry Pi OS (32-bit) Lite and burn the image to a sdcard of at least 8GB. To avid connecting the Pi to a monitor you can follow the instructions to set up WiFi and ssh (scroll down to number 3) for a headless setup.
Once your Pi is connected to the network and you're logged via ssh as pi user there are some simple tasks to do:
-
For security reasons it is recommended that you change the pasword of default user pi
pi@raspberry:~ $ passwd -
Update packages.
sudo apt update
sudo apt upgrade
Basic configurationLink
Run the sudo raspi-config command to change the base configuration:
Keyboard:
If you need you can change keyboard, WLAN country and timezone
settings using raspi-config. Run raspi-config command and select
5 Localization Options.
Hostname:
Still in raspi-config,
- Select
System Options - Select
S4 Hostname - Question:
Please enter a hostname: Entercablebot - Select
OK
Wifi:
In raspi-config,
- Select
1 System Options - Select
S1 Wireless LAN - Question:
Please enter SSIDType the name of the WiFi network you want to connect to. - Question:
Please enter passphrase. Leave it empty if none.Type the password. - Click
OK
SSH:
In raspi-config,
- Select
3 Interface Option - Select
I2 SSH - Question:
Would you like the SSH server to be enabled?SelectYes
Make sure to test the remote login. To know the IP address of the Pi, run the following command:
$ ip a
1: lo: <LOOPBACK,UP,LOWER_UP> mtu 65536 qdisc noqueue state UNKNOWN group default qlen 1000
    link/loopback 00:00:00:00:00:00 brd 00:00:00:00:00:00
    inet 127.0.0.1/8 scope host lo
       valid_lft forever preferred_lft forever
    inet6 ::1/128 scope host
       valid_lft forever preferred_lft forever
2: eth0: <NO-CARRIER,BROADCAST,MULTICAST,UP> mtu 1500 qdisc mq state DOWN group default qlen 1000
    link/ether e4:5f:01:93:b6:a3 brd ff:ff:ff:ff:ff:ff
3: wlan0: <BROADCAST,MULTICAST,UP,LOWER_UP> mtu 1500 qdisc pfifo_fast state UP group default qlen 1000
    link/ether e4:5f:01:93:b6:a7 brd ff:ff:ff:ff:ff:ff
    inet 172.20.10.12/28 brd 172.20.10.15 scope global dynamic noprefixroute wlan0
       valid_lft 86163sec preferred_lft 75363sec
    inet6 2a02:8440:3141:50b1:d111:5312:d516:8327/64 scope global mngtmpaddr noprefixroute
       valid_lft forever preferred_lft forever
    inet6 fe80::1577:9a8:248f:7648/64 scope link
       valid_lft forever preferred_lft forever
The IP address of the WiFi interface can be found in the wlan0 section. In our case, it is 172.20.10.12. Now try to log in from a remote machine on the same network:
$ ssh romi@<IP-ADDRESS>
Replace IP-ADDRESS with the address found using ip a. Make sure that this work before continuing because further down we are going the deactivate the login console on the screen.
Enable the legacy camera interfaceLink
On newer version of the OS image, the legacy interface has to be activated manually. This can be done using raspi-config:
$ sudo raspi-config
- Select 3 Interface Options
- Select I1 Legacy Camera
- Select Yes
- Reboot
Configure the serial portsLink
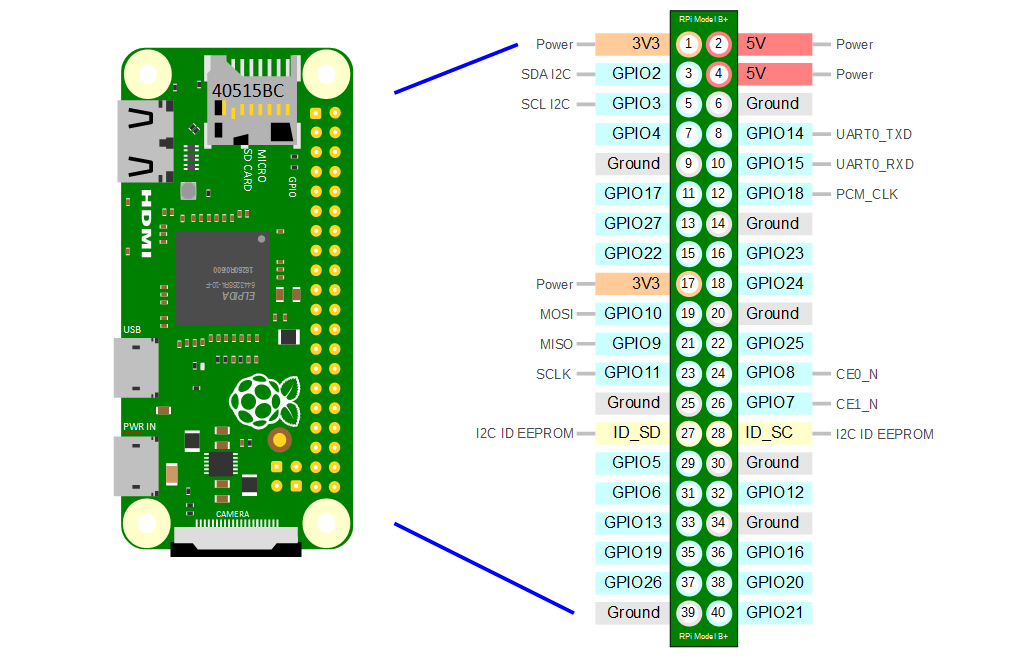
The Raspberry Pi Zero W has one "real" serial controller, called UART0 or PL011, and one more limited serial controller, called UART1 or mini UART.
(The list of pins on the 40-pin GPIO header can be found here: https://pinout.xyz/) (See also the Raspberry Pi documentation: https://www.raspberrypi.com/documentation/computers/configuration.html#configuring-uarts)
By default, the Raspberry Pi is configured as follows:
- UART0 is used to communicate with the Bluetooth controller. It is mapped to /dev/ttyAMA0.
- UART1 is used for the Linux console. By default, the mini UART is mapped to the pin 8 (GPIO 14) for TX, and pin 10 (GPIO 15) for RX. The serial device is mapped to /dev/ttyS0.
The GPIO pins 14 and 15 are used for the "primary" serial. By default, UART1 is the primary serial.
For the Cablebot, we want to change this as follows:
- UART0 connects the motor controller on GPIO pins 14 and 15 (pins 8 and 10)
Disabling Bluetooth will make UART0 available again.
In /boot/config.txt, add the following line at the end of the file (after [all]):
dtoverlay=disable-bt
This disables the Bluetooth kernel module.
Then, disable the console on the serial port. In /boot/cmdline.txt, remove:
console=serial0,11520
In a terminal, run the following command to disables the modem and Bluetooth services of the OS:
sudo systemctl disable hciuart.service
sudo systemctl disable bluealsa.service
sudo systemctl disable bluetooth.service
And reboot:
sudo reboot
After these changes, UART0 will be the primary serial and connected to GPIO pins 14 and 15.
It does not seem possible to have both serial active and available in GPIO pins. This is because both UART0 and UART1 are (hard)wired to GPIO pins 14 and 15...
Alternatively (to be tested):
$ sudo raspi-config
- Select 3 Interface Options
- Select I6 Serial Port
- Question: Would you like a login shell to be accessible over serial? Select No
- Question: Would you like the serial port hardware to be enabled? Select Yes
The confirmation dialog should display:
The serial login shell is disabled
The serial interface is enabled
Create user romiLink
Create user romi, set password and add it to needed groups.
sudo useradd romi
sudo usermod -a -G sudo,adm,dialout,video,netdev,plugdev,gpio romi
Quit the current shell and reconnect using the "romi" login.
Clone, compile, and install the softwareLink
As user "romi" do:
For the main software:
$ git clone --branch ci_dev --recurse-submodules https://github.com/romi/romi-rover-build-and-test.git
$ cd romi-rover-build-and-test
$ mkdir build
$ cd build
$ cmake ..
$ make rcom-registry
$ make romi-cablebot
For the firmware of the motor controller:
$ cd ~
$ git clone https://github.com/romi/romi-cablebot.git
$ cd romi-cablebot
$ TODO
For the firmware of the camera pan controller:
$ TODO
Install the Apache web serverLink
$ sudo apt install apache2
$ sudo nano /etc/apache2/sites-enabled/000-default.conf
Change DocumentRoot in /etc/apache2/sites-enabled/000-default.conf to /home/romi/romi-rover-build-and-test/applications/romi-monitor/
Also add:
        <Directory /home/romi/romi-rover-build-and-test/applications/romi-monitor/>
                   Options Indexes
                   AllowOverride None
                   Require all granted
        </Directory>
apache2.service with systemctl:
sudo systemctl restart apache2.service
Starting the software on bootLink
$ sudo nano /etc/rc.local
#!/bin/sh -e
#
# rc.local
#
# This script is executed at the end of each multiuser runlevel.
# Make sure that the script will "exit 0" on success or any other
# value on error.
#
# In order to enable or disable this script just change the execution
# bits.
#
# By default this script does nothing.

# Print the IP address
_IP=$(hostname -I) || true
if [ "$_IP" ]; then
  printf "My IP address is %s\n" "$_IP"
fi

sudo -u romi /home/romi/romi-rover-build-and-test/build/bin/rcom-registry &

exit 0
Extra: OverlayFSLink
To avoid file system corruption on Raspberry Pi's that can have their power interrupted suddenly, having a read-only file system it's a good option.
In computing, OverlayFS is a union mount filesystem implementation for Linux. It combines multiple different underlying mount points into one, resulting in single directory structure that contains underlying files and sub-directories from all sources. Common applications overlay a read/write partition over a read-only partition, such as with LiveCDs and IoT devices with limited flash memory write cycles. Wikipedia
When using OverlayFS no filesystem change will survive reboot, that means no bash history!
RaspbianLink
In raspbian you can run raspi-config and under Advanced Options you will find Overlay FS option:

Just enable it and set boot partition to read only (raspi-config will ask you for this) and reboot. You can revert this changes with the same procedure.
ArchlinuxLink
Install Raspi-OverlayrootLink
git clone https://github.com/nils-werner/raspi-overlayroot
cd raspi-overlayroot
makepkg -si
Enable overlayroot hookLink
Then in /etc/mkinitcpio.conf
- add
overlayto yourMODULESarray - add
overlayrootto yourHOOKSarray
and rebuild the initramfs by running
mkinitcpio -P
Enable overlayroot in commandlineLink
With the initramfs in place, you can now enable overlayroot by adding overlayroot to the end of the Kernel commandline, editing /boot/cmdline.txt
root=/dev/mmcblk0p2 rw rootwait console=ttyAMA0,115200 console=tty1 selinux=0 plymouth.enable=0 smsc95xx.turbo_mode=N dwc_otg.lpm_enable=0 kgdboc=ttyAMA0,115200 elevator=noop overlayroot
Set filesystems readonlyLink
You can now also set the entire root filesystem as readonly by changing rw to ro in the Kernel commandline
root=/dev/mmcblk0p2 ro rootwait console=ttyAMA0,115200 console=tty1 selinux=0 plymouth.enable=0 smsc95xx.turbo_mode=N dwc_otg.lpm_enable=0 kgdboc=ttyAMA0,115200 elevator=noop overlayroot
ro to /etc/fstab
#
# /etc/fstab: static file system information
#
# <file system> <dir>   <type>  <options>   <dump>  <pass>
/dev/mmcblk0p1  /boot   vfat    defaults,ro     0       0
Editing the root filesystemLink
You can run rwrootfs to remount all file systems as read-write and change into an interactive shell in your SD card file system. After exiting that shell, the fileystems will remain read-write until next reboot.
Alternatively you can undo all changes from Enable overlayroot in commandline and Set filesystems readonly and reboot. This is the recommended way of system upgrades.
Info
Resources
* https://github.com/nils-werner/raspi-overlayroot
* https://wiki.archlinux.org/title/Overlay_filesystem
Extra: Romi autosshLink
Locating a Romi device (ej. cablebot) on a network can be a dificult task depending on the network topology. Services like Dataplicity can solve this problem but have some disatvantages as not being free software, cost, vendor lock, etc.
Having a server accesible via a public IP address is enough to make this work. Maintaining a persistent SSH reverse tunnel with autoSSH between the Romi device and the server will allow us to access the device from anywhere without knowing his IP address.
Client side (Romi device)Link
Generate a rsa key (withouth passphrase)Link
ssh-keygen
Copy your key to the server to allow passwordless access.Link
The user must exist already on the server, we recomend creating a specific user for this task.
ssh-copy-id user@server
Test a reverse SSH tunnelLink
Select a specific port for each of the devices to use on the port-s:localhost:22 part of the command, so that port number (port-s) of the server will be linked to port 22 on the device.
ssh -R port-s:localhost:22 [-p srv-ssh-port] user@server-with-public-ip
ssh -J user@server -p port-s user@localhost
If that worked we can now setup the autossh to make the conection on boot and keep it alive.
Install autosshLink
Depending on your linux package manager, ej. sudo pacman -S autossh or sudo apt install autossh
Test autossh reverse tunnelingLink
autossh -M 0 -f -o "ServerAliveInterval 45" -o "ServerAliveCountMax 2" -N -R port-s:localhost:22 [-p srv-ssh-port] user@server-with-public-ip
Options:
-M Specifies monitor port. May be overridden by environment variable AUTOSSH_PORT. 0 turns monitoring loop off. -f Run in background (autossh handles this, and does not pass it to ssh.) -N Do not execute a remote command. This is useful for just forwarding ports. -R [bind_address:]port:host:hostport Specifies that connections to the given TCP port or Unix socket on the remote (server) host are to be forwarded to the local side.
From the autossh manual page:
Setting the monitor port to 0 turns the monitoring function off, and autossh will only restart ssh upon ssh's exit. For example, if you are using a recent version of OpenSSH, you may wish to explore using the ServerAliveInterval and ServerAliveCountMax options to have the SSH client exit if it finds itself no longer connected to the server. In many ways this may be a better solution than the monitoring port.
So we are using ServerAliveInterval:
Sets a timeout interval in seconds after which if no data has been received from the server, ssh(1) will send a message through the encrypted channel to request a response from the server.
and ServerAliveCountMax:
Sets the number of server alive messages (see below) which may be sent without ssh(1) receiving any messages back from the server. If this threshold is reached while server alive messages are being sent, ssh will disconnect from the server, terminating the session.
that means that after 45 seconds ssh by itself will try to communicate with the server, if it fails will try again in 45 more seconds and after two failures it will terminate the session, in wich case autossh will restart the connection.
Starting autossh on boot with systemdLink
Create a new file /etc/systemd/system/autossh.service and add this to it, remember to set your port (port-s):
[Unit]
Description=AutoSSH service for port port-s
After=network.target

[Service]
User=user
Environment="AUTOSSH_GATETIME=0"
ExecStart=/usr/bin/autossh -M 0 -o ControlMaster=no -o "ServerAliveInterval 45" -o "ServerAliveCountMax 2" -N -i ~/.ssh/id_rsa -R port-s:localhost:22 [-p srv-ssh-port] user@server-with-public-ip

[Install]
WantedBy=multi-user.target
Now enable and start the service:
sudo systemctl enable autossh
sudo systemctl start autossh
From now autossh will be started at boot time and will keep the tunnel alive.
Warning
Only tested on Arch Linux.
Server sideLink
The simplest way is using the same user in the server and the clients, so if you haven't already created the user, do it.
No Password logins (optional)Link
For extra security you can disable password login, only allowing logins with keys:
sudo vi /etc/ssh/sshd_config
PasswordAuthentication yes to PasswordAuthentication no.
Or if you want to restrict password logins only for a specific user (eg. romi) comment the previous line: #PasswordAuthentication no and add this content to the file:
Match User user(romi)
    PasswordAuthentication no
The inconvenience of this approach is that every time you want to add a new key (give rights to a new device) you will need to change this temporarily to allow password logins. Remember that after changing the sshd_config file you need to restart the service with systemctl restart sshd.
Restrict client commandsLink
To avoid security risks in case a key on a romi-device has been compromised, we are going to restrict the commands that the client is able to execute to the minimal.
This can be achieved by editing ~/.ssh/authorized_keys, by prefixing the desired key, e.g. as follows:
command="" ssh-rsa …
This will allow any login with this specific key only to execute the command specified between the quotes, none in this example.
Client side (user computer)Link
Generate and copy RSA keyLink
If you haven't generated your ssh key do it with the ssh-keygen command and copy this key to the server and the romi device.
Setup connection with ssh config fileLink
Add a new entry in your .ssh/config with the following content:
Host tunnel
    Hostname server-with-public-ip
    [port srv-ssh-port]
    user user

Host romi-device
    Hostname localhost
    port port-s
    user user
    ProxyJump tunnel
ssh romi-device to log in your device.