Assembly instructions for the second version of the plant imagerLink
This is the documentation for the second iteration of the plant imager hardware.
Assembly overviewLink
You will have to achieve the following steps:
- assemble the aluminium frame: instructions
- assemble the X-Carve CNC: instructions
- attach the CNC the to aluminium frame
- assemble one of the electronic controller:
- X-controller: instructions
- gShield hat : instructions
- wire the X-Carve CNC motors & endstops to the controller
- assemble & mount the custom gimbal: instructions
- choose a camera & build the camera mount
- PiCamera: instructions
- Sony RX-0
- gPhoto2 compatible camera
- [OPTIONAL] add the LED bars inside
- wiring it all.
Open HardwareLink
We use "widely available" materials and provides all the required information, so you can reproduce and modify our work.
If you want to modify it, please note the following important points:
- The width and depth of the aluminium frame is dependent of the CNC frame size, make sure the CNC frame fits inside the aluminium frame!
- The height of the aluminium frame will determine the maximum observable plant height.
Wiring & communication overviewLink
The plant imager electronics can be divided in two functional groups:
- the "CNC group", responsible for moving the camera around;
- the "Gimbal & Camera group", allowing to rotate the camera around the z-axis to face the object (plant) to acquire.
Note that the CNC group has 3 axis movement (X, Y & Z), the gimbal add a forth one.
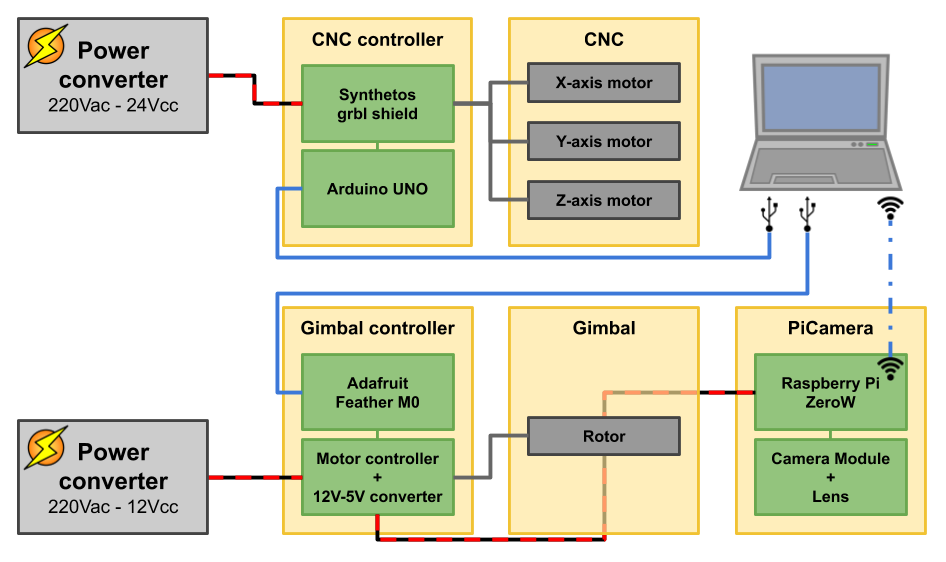
The two groups communicate with the main controller by USB. Note that since the gimbal & camera are located at the end of the arm on the z-axis, the USB cable powering & controlling them are going through the cable rails with those dedicated to the axis motors. This may create interference, so you will need a (long) properly shielded USB cable!