ROMI Rover User ManualLink

Draft v2 - Rover V3 - Summer 2022
This manual describes the usage of a fully assembled and ready-to-use rover.
The information on how to build your own rover can be found in a separate document. Visit the ROMI web site at https://docs.romi-project.eu for more information.
© Sony Computer Science Laboratories - CC BY-SA 4.0 Licence
AcknowledgementsLink
ROMI has received funding from the European Union's Horizon 2020 research and innovation programme under grant agreement No 773875.
Short descriptionLink
The ROMI Rover is a farming tool that assists vegetable farmers in maintaining vegetable beds free of weeds. It does this by regularly hoeing the surface of the soil and thus preventing small weeds from taking root. It can do this task mostly autonomously and requires only minor changes to the organisation of the farm. It is designed for vegetable beds between 70 cm and 110 cm wide (not including the passage ways) and for crops up to 50 cm high. It currently handles two types of crops, lettuce and carrots. The lettuce can be planted out in any layout, most likely in a quincunx pattern. In this configuration the rover uses a precision rotary hoe to clean the soil both between the rows and the plants. For carrots, the rover uses classical mechanical tools, such as stirrup hoe, to regularly clean the soil in between the rows. In this configuration, the carrots should be sown in line.
A weekly passage of the robot should be sufficient to keep the population of weeds under control.
In addition to weeding, the embedded camera can be used to collect images of the vegetable beds.
The ROMI Rover is targeted at farms that grow small crops, such as lettuce and carrots, on a relatively small surface, between 200 m² and 5 ha (Utilised Agricultural Area).
Technical specificationsLink
This section details the technical specifications, operating instructions and configuration of the current version of the Romi rover: V3.
| Characteristic | Value |
|---|---|
| Dimensions | Width: Adjustable between 1.42 m and 2 m Length: 1.8 m Height: 1.44 m With tool carrier: add 1 m to length |
| Weight | 140 kg |
| Battery life | 8 h (approx. dependent on use case) |
| Charging time | TODO |
| Weeding speed | Precision weeding: 235 m²/day Classical weeding: 6400 m²/day |
| Width vegetable beds | Between 0.7 and 1.1 m |
| Handled crops | Precision weeding: Lettuce Classical weeding: Carrots |
| Turning space at end of bed | 2.8 m (3.5 m with tool carrier) |
Functional specifications and requirementsLink
The following configuration is required for the use of the ROMI rover.
| Image | Price | Features/Function | |
|---|---|---|---|
| ROMI rover with a remote control, a battery charger, and a protective cover | 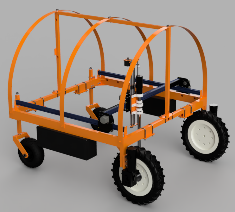   |
5000 € (estimate) | - Prevents weed development - Takes image scans of the beds |
Overview of the componentsLink
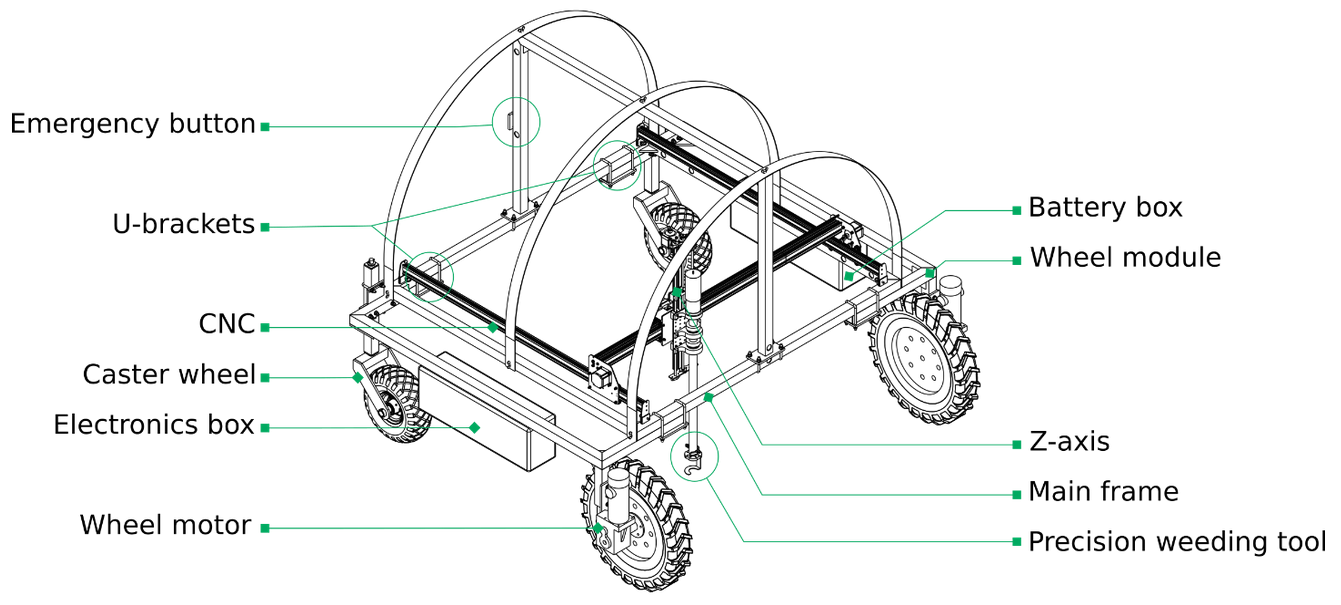
- The control panel: The control panel provides a means to view status messages, and request the rover to perform a preconfigured action.
- The on/off switch: The on/off switch can be found on the electronics housing.
Operation instructionsLink
Overview of the rover’s usageLink
The basic usage of the rover is to position it on a vegetable bed and let the machine clean the top-soil with a rotating precision hoe. The rover must be taken to the field using the remote control. The robot currently expects the vegetables to be grown in "beds" of 0.7 m to 1.1 m wide. The robot is designed for smaller market farms of less than 5 ha but the size of the farm depends on the number of rovers that you will use, and the amount of crop you want to cover. The rover can navigate autonomously along a bed if there is a clear line of crops that it can follow.
Once the rover is positioned at the beginning of a bed, it hoes the surface of the soil so that small weeds cannot take root. It can perform this action along the entire length of the bed. Note that the rover cannot remove mature weeds that have already established themselves. It is therefore necessary to start with a vegetable bed that has been cleaned from all weeds. This can be done with various classical techniques to prepare the vegetable beds. Once the beds are clean, the rover can be used to maintain them as such.
Two weeding methods are available. First, a precision weeding method in which the top-soil is turned over in between the rows (also called "inter-row") and between the plants (or "intra-row"). Second, a classical weeding method in which standard weeding tools are dragged behind the rover between rows of vegetables.
For the precision weeding method, the rover uses a camera to detect the plants that are underneath the rover. It then moves the precision weeding tool over the surface whilst passing closely around the detected vegetables.
Although the rover is autonomous for weeding a single bed, it is important to stay in proximity to the rover. A U-turn must also be manually performed at the end of the bed and the rover repositioned in line with the rails of the next bed.
Setting up the vegetable bedsLink
The use of the rover requires relatively flat beds. Precision weeding works best if the surface of the culture beds is planar. Ideally, the alleys between the beds should also be flat, to facilitate navigation of the rover. Otherwise, there is a risk that the tool will detach from the soil or that it will dig into the soil. There is no precise measure of how flat the beds should be but small holes in the ground should be avoided. The presence of stones should also be avoided. Small stones (approx. 1 cm) should not perturb the rover very much.
NOTE: It is more convenient if the width of the vegetable beds are constant so that the width of the rover doesn't have to be adapted beds.
Setting up the Wi-Fi access pointLink
The use of a Wi-Fi access point is optional but strongly recommended. The rover must be connected to a Wi-Fi access point with Internet access for the following functionality:
- To automatically upload the images taken by the rover to the Farmer’s Dashboard web application.
- For remote maintenance.
Both features are optional and can be left out when the rover is used for weeding only.
However, if you decide to use an access point, it is important that the Wi-Fi signal is strong enough in all the zones where the rover will be used. If not, it may be impossible to connect to the rover’s web interface with a phone or tablet to send instructions to the rover. It will still be possible to send instructions to the rover using the control panel (see "Controlling the rover through the control panel").
The set-up of the Wi-Fi network is not part of the ROMI Rover package. In case of doubt, you should seek advice from a professional about the best solution for your premises. However, below, we briefly discuss several options. Use an existing Wi-Fi router: If the zone where you wish to use the rover is adjacent to existing infrastructure (home, barn) and you have the possibility to install an Internet connection at the premises (ADSL modem over a phone line or any other solution), the Wi-Fi capabilities of the modem can be used to offer Internet access to the rover.
Expand the reach of an existing Wi-Fi network: An existing Wi-Fi can be extended to increase its reach using Wi-Fi range extenders. They pick up and retransmit an existing Wi-Fi signal. Most extenders require a standard power supply although some can be powered using an USB battery. Using an Ethernet cable of up to 100 metres long, it is possible to position a secondary access point. Some of the Wi-Fi access points can be powered directly over the Ethernet cable (PoE, Power over Ethernet) removing the need for a power socket. It is also possible to send the network signal over existing electricity cables using a technology called power-line communication (PLC). Finally, there exist also long-range wireless outdoor WiFi extenders that transmit the network between two antennas designed for transmission over distances from a 100 metres to over a kilometre.
Install a GSM Wi-Fi router: If there is a good mobile phone signal strength in the field, a GSM Wi-Fi router is a viable option. A GSM Wi-Fi router connects to the Internet over a mobile data link (4G, 3G, HSDPA…) and provides access to other devices over Wi-Fi. Separate routers with good antennas can be purchased at reasonable prices but generally require a power plug. Smaller, USB-powered routers are available also and can be plugged directly into a USB port inside the rover. A mobile phone configured as a hotspot is an alternative solution (although with a smaller range than a dedicated router with good antennas). The downside of this option is that it requires a SIM card and a subscription with a mobile network operator.
Using a USB GSM modem: In contrast to the solution above, a USB GSM modem is not a stand-alone router but, when plugged in, the Raspberry Pi will see the modem as an additional network interface. In this set-up, the rover remains the hotspot for the Wi-Fi network but will route any Internet traffic through the GSM modem. This solution may require additional changes to the network configuration of the Raspberry Pi.
Charging the roverLink
The rover uses two 12 V Lithium batteries (the internal working voltage is 24 V). Use the supplied Victron Energy Blue Smart IP67 24V 5A Charger to reload the batteries. Plug 230 V side of the charger in a regular power plug. The 24 V side must be plugged into the POWER CHARGER plug on the battery box. The charger has LED indicators to show the status of the charging cycle. It is also possible to follow the status using a mobile phone using a Bluetooth connection. Check the official manual provided by Victron Energy charger for details.
Protection coverLink
The rover comes with a PVC protection cover. The cover must always be placed on the rover when the precision weeding is used. If the precision weeding is not used, it can be removed if there is no risk of the CNC becoming wet. The CNC, on its own, is not waterproof. If the CNC is removed, it is possible to use the rover without cover in light rain conditions (TODO: IP level?...)
Attendance (TODO: regulations?)Link
IMPORTANT: The rover must be used only in the presence of an operator. The operator must be within a distance of XXX metres of the rover and must be able to reach the rover quickly in case of an emergency. The operator should carry the remote control with them at all times whilst the rover is on. This is in order to be able to recover the navigation control of the rover in all circumstances (TODO: add emergency button on the remote control or use certified controller for industrial use). The rover should not be used in proximity to people who have not been instructed to use the rover (TODO). IMPORTANT: The rover must be used only during the day in good light conditions.
StorageLink
The rover should be kept in a covered and dry space when not in use.
Emergency buttonLink
The emergency button on the back of the rover can be used to cut the power to the motors and CNC at any time. To cut the power, push the red button. To power up the motors, the button must be reactivated. This can be done by pulling the button out again.
CAUTION: Before reactivating the button, make sure that the CNC and wheel motors are not moving.
Adjusting the width of the roverLink
The wheel-base of the rover can be adjusted to fit the variable width of the rails and beds. To adjust the width of the rover, loosen the four U-brackets that fix the wheel modules to the main frame and slide the wheel modules to the desired position. Ensure that the position of the modules is symmetric relative to the main frame.
After a change to the width of the wheel-base, the CNC may have to be recalibrated if the weeding tool should work on a larger or smaller bed size (see "Calibrating the CNC")
Engaging/disengaging the motor lock levers (freewheeling mode and drive mode)Link
The two wheel motors each have a lock lever that allows them to switch between freewheeling mode or motor drive mode. When the lock lever is in the horizontal position the wheels are freewheeling. In freewheeling mode, the robot can be moved simply by pushing it. Turn the lever 90° into the vertical position - pointing to the ground - to switch the drive mode. In the drive mode, the wheels are powered by the motors and to move the rover you must use the remote control or the command interface.
Mnemonic tip: When the handle points to the ground, the traction goes to the soil. When the handle is parallel to the axis, the traction "stays" in the axis. CAUTION: Only switch to the drive mode when the rover is "off" to assure that the motors are powered off.
Lock lever vertical: Motor drive mode

Lock lever horizontal: Freewheeling mode

Control panel state messageLink
The display of the control panel is divided in two lines. The upper line shows current status of the rover:
-
Ready: The rover is ready for use. The on-board computer is running and the motors can be powered up.
-
Navigating: The rover is in navigation mode. Use the controller to steer the rover.
-
System Failure: The rover encountered an error from which it cannot recover. Please restart the rover.
Start-up procedureLink
If it is the first usage of the rover, you should go to the section "First time configuration".
Before starting up, the rover should be in the following state:
- Verify that the emergency button is deactivated (pushed in).
- Verify that the on/off switch on the electronics housing is off.
The start-up can now proceed:
- Engage the lock levers on the motor to put the motors into drive mode.
- Turn the on/off button on the electronic housing on.
- Activate the emergency by pulling it out.
- The rover should begin the start-up sequence.
- When the start-up is completed, the display will show "Ready".
- The motors of the wheels and the CNC are now powered up.
You can now use the controller of the web interface to navigate the rover or send commands to the rover.
Shut-down procedureLink
To turn off the rover, take the following steps:
- Deactivate the emergency button by pushing it in. This removes the power supply to the motor and CNC.
- Turn off the on/off button on the electronics housing
Switching from drive to freewheeling modeLink
When the rover is in drive mode (motors powered on, the lock levers on the motor engaged/vertical), it is possible to go to freewheeling mode as follows:
- Turn off the power of the motors by pressing the red emergency button.
- Turn the motor lock levers in the horizontal position (disengaged).
Once these steps are completed, you can move the rover by pushing it.
Switching from freewheeling to drive mode (TODO: this is not safe, yet)Link
To switch from freewheeling to drive mode, the rover’s state should be ”On”, the user may then perform the following operations:
- Turn the motor lock levers in the vertical position (engaged).
- Pull the red security button to power the motors.
CAUTION: Make sure that the speed and direction controllers of the remote control are in the neutral position.
Accessing the web interface of the roverLink
Adapt the Wi-Fi settings of the phone, tablet, or computer such that it connects to the same Wi-Fi network as the rover. The interface of the rover is accessible through a web browser. On the mobile device, open up your preferred web browser (see "Supported web browsers") and in the address field enter the following URL: http://romi-rover.local.
To facilitate access to the interface in future uses, you can add the address to your bookmarks.
Using the controllerLink
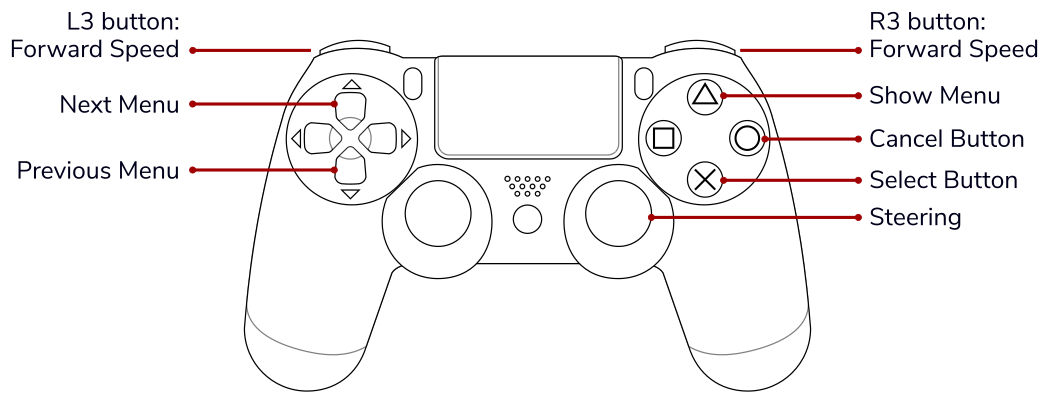
The rover comes with the Sony DUALSHOCK®4 Wireless Controller.
The remote controller must be recharged using a micro USB cable that is plugged into the front of the controller. The controller is sensitive to the recharger. Make sure to use a quality recharger.
Controlling the rover through the control panelLink
You can send commands to the rover or activate the navigation mode using the controller as follows.
Send a command to start an actionLink
The rover must be in the Ready state. Then press the Show Menu button.
The name of the first task will appear on the bottom line of the display. Use the Next Menu and Previous Menu buttons to navigate in the list of possible tasks. To cancel and return to the main screen, press Cancel Button.
Press the Select Button a second time to confirm the action, or press cancel to return to the menu screen.
Switching to navigation modeLink
XXX
Changing the list of rover actionsLink
The file uses the JSON format to describe the list of scripts and the associated sequences of actions. The general structure is as follows:
[
    {
        "name": "move-forward",
        "display_name": "Forward",
        "script": [
            { "action": "move", "distance": 0.60 }
        ]
    },
    {
        "name": "move-backward",
        "display_name": "Backward",
        "script": [
            { "action": "move", "distance": -0.60 }
        ]
    },
    {
        "name": "scan",
        "display_name": "Scan",
        "script": [
            { "action": "start_recording" },
            { "action": "move", "distance": 3.6 },
            { "action": "stop_recording" }
        ]
    }
]
The file contains a list of scripts. Each script has a name that is used to identify the script, a display_name that is shown in the user interface, and a script field that consists of a list of actions. The list of available actions and their parameters is out of the scope of this manual. Please refer to the online documentation at https://docs.romi-project.eu/Rover/configuration/ for details.
If you make modifications to the file, it is very important that the new content is a valid JSON file. If not, the rover will fail to load the file and no buttons will be shown in the user interface.